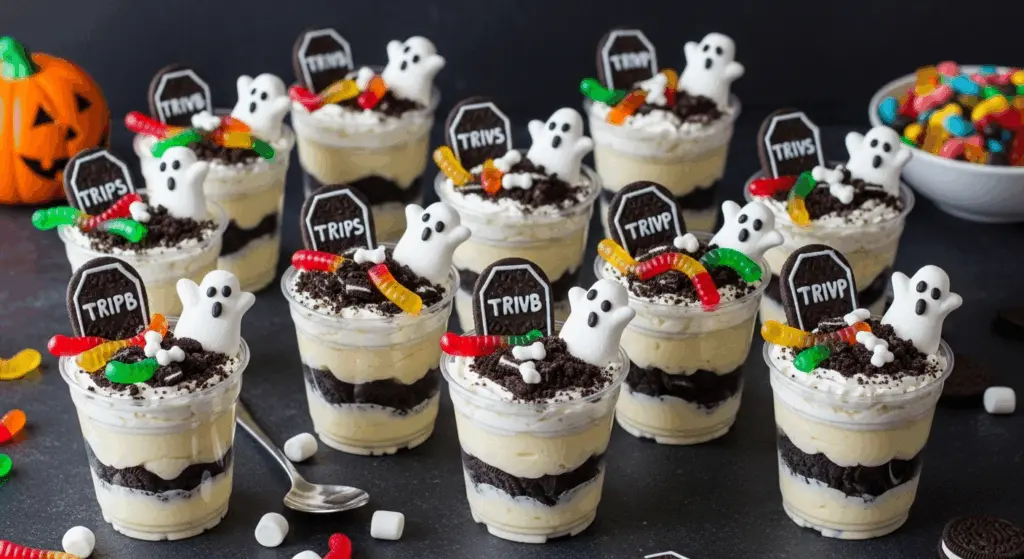
Get ready to bring a spooky twist to snack time with this easy and quick recipe for Halloween Dirt Cups! This no-bake dessert is layered with rich chocolate pudding, crushed cookies, and creepy candy creatures that kids and adults can’t resist. Whether you’re prepping for a Halloween party, classroom treat, or movie night marathon, these cups are a go-to favorite. In this guide, I’ll share my story, tips for assembly, and fun presentation ideas, all designed to make your dessert table scream with creativity. If you’re short on time and big on flavor, this one’s for you.
Ready to dig in? Let’s bring this edible graveyard to life!
Table of Contents
A Frighteningly Fun Tradition
These Halloween Dirt Cups will became a family tradition after this one. make your kids help you mom layer pudding and Oreo crumbs into little cups. And don’t be afraid of getting creative, like adding candy bones, and marshmallow ghosts. Make it always about the fun of it. That’s what I love most about this dessert: it brings people together. No one’s too old to enjoy a spooky snack!
And it’s not just fun, it’s simple. This is an easy and quick recipe that requires zero baking, minimal prep, and delivers major wow factor at parties. Whether you’re hosting a costume bash or just need a dessert kids can help assemble, dirt cups are a guaranteed hit.
Want to creep it real? Pair them with these Halloween Brownie Bites or whip up a Monster Cookie Cake for a dessert table that haunts in the best way.
Ingredients & Assembly
Simple Pantry Staples for a Spooky Treat
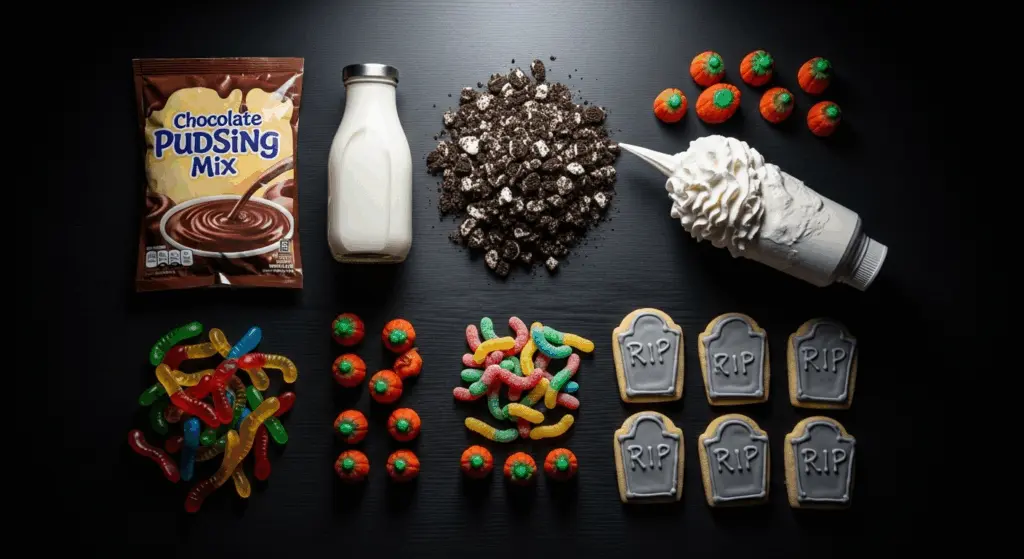
The best thing about Halloween Dirt Cups? You don’t need anything fancy. This is a true easy and quick recipe, perfect for when you’re juggling Halloween decorations, costumes, and a dozen other to-dos. Everything here can be grabbed in one quick store run, or you probably already have most of it in your pantry!
Here’s everything you’ll need:
| Ingredient | Details | Substitution |
|---|---|---|
| Chocolate Pudding Mix | 2 (3.9 oz) boxes, instant | Vanilla or butterscotch pudding; or homemade chocolate pudding |
| Milk | 4 cups, cold (for pudding) | Almond, oat, or soy milk (use unsweetened for best results) |
| Oreo Cookies | About 20, crushed finely (remove filling for best texture) | Chocolate graham crackers, gluten-free sandwich cookies, or chocolate wafers |
| Whipped Topping | 1 (8 oz) tub, thawed | Homemade whipped cream or dairy-free whipped topping |
| Gummy Worms | 1 bag, assorted colors | Candy bones, candy eyeballs, or sour gummy critters |
| Tombstone Cookies | Milano cookies or similar, decorated with “RIP” icing | Ginger snaps, rectangular graham crackers, or sugar cookies |
| Mini Candy Pumpkins (optional) | To decorate tops | Reese’s Pieces, orange jelly beans, or candy corn |
These simple ingredients create a dessert that feels like it came from a bakery. And if you’re already in the Halloween mood, you’ll love pairing this with our indulgent Chocolate Pumpkin Cheesecake Bars.
Step-by-Step: Assembling the Perfect Dirt Cup
Once you’ve got everything ready, the assembly is super satisfying, and perfect for little helpers!
- Make the pudding: In a large mixing bowl, whisk the chocolate pudding mix with cold milk. Let it set for 5 minutes until thickened.
- Fold in whipped topping: Gently stir in the whipped topping to give the pudding a light, mousse-like texture.
- Crush the Oreos: Use a food processor or rolling pin to finely crush your cookies. No chunks, you want a “dirt” texture.
- Layer up: In clear plastic cups, alternate layers of pudding and cookie crumbs. Begin with pudding and finish with “dirt” on top.
- Decorate: Insert a tombstone cookie into the top layer, tuck in a few gummy worms, and finish with a mini candy pumpkin or two.
Want more spooktacular sweets? These S’mores Sandwich Peanut Butter Cookies are fall-flavored fun, and the Peanut Butter Spider Cookies are crawling with peanut buttery goodness.
Tips, Swaps & Serving ideas
Flavor & Topping Variations to Try
One of the best parts about Halloween Dirt Cups is how easily you can mix things up without compromising that spooky charm. If you want to surprise your guests or cater to different tastes, here are some fun ways to add your own twist:
Swap out the classic chocolate pudding for vanilla and tint it green with food coloring for a ghoulish twist. You can also layer in mini chocolate chips, crushed Halloween candies, or even caramel drizzle for added texture. Instead of gummy worms, why not use candy eyeballs, candy bones, or mini marshmallow ghosts?
Looking to make them allergy-friendly?
- Use gluten-free chocolate cookies instead of Oreos.
- Opt for dairy-free pudding and plant-based whipped topping for vegan versions.
- Choose gelatin-free gummies for vegetarian treats.
These creative upgrades help make your dirt cups as inclusive as they are delicious. Speaking of creative, if you’re in the mood for another unexpected Halloween combo, you’ll love these Pumpkin Cheesecake Cookies, they’re rich, creamy, and full of fall flavor.

Presentation Tricks to Wow Your Guests
Halloween is all about the visual spook factor, and how you serve your dirt cups can really take them to the next level. Go for clear plastic cups to show off the layered “dirt” or use mini mason jars for rustic flair. Hosting a party? Line up your dirt cups on a black tray with LED lights underneath or surround them with fake spider webs for an eerie effect.
Top them off with Halloween-themed paper picks, “RIP” signs, or mini skeletons to add personality. These make excellent additions to school events, potlucks, or spooky movie nights.
Want more simple crowd-pleasers? Check out these Easy Halloween Cookies that are just as festive and effortless as these dirt cups.
Storage, Make-Ahead & Fun Extras
How to Store & Make Ahead
If you’re juggling a costume party, decorating pumpkins, and trying to keep candy out of the dog’s mouth (we’ve all been there), you’ll love how low-stress these Halloween Dirt Cups really are. While they’re best when served fresh, you can absolutely prep parts of the recipe in advance to save time.
Make your pudding mixture up to 24 hours ahead, store it in an airtight container, and keep it refrigerated. You can also crush the Oreos and prep toppings in separate containers. Wait to assemble the cups until just before serving so the cookie “dirt” stays crunchy instead of soggy.
Assembled cups can be covered with plastic wrap and stored in the fridge for up to 2 days. But if you’re using decorative tombstone cookies, add them last minute to keep them from softening. And while freezing is technically possible, it tends to ruin the pudding’s smooth texture, so it’s not recommended.
Hosting a fall get-together? Pair these cups with cozy bakes like Pumpkin Pie Cookies for a well-rounded treat table.
Kid-Friendly DIY Dirt Cup Station
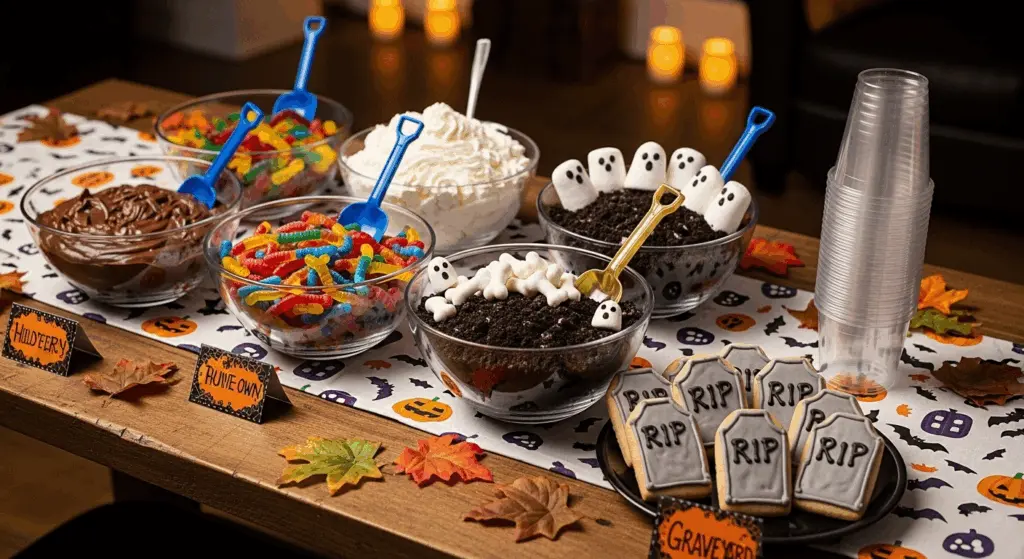
Want to really impress your party guests (and keep kids entertained)? Set up a “Build-Your-Own Graveyard” station! Lay out all the ingredients in bowls: pudding, crushed cookies, whipped topping, gummy worms, candy bones, marshmallow ghosts, and tombstone cookies.
Let everyone layer their own cup and decorate it however they like. It’s a creative, interactive way to turn dessert into a party activity, perfect for classroom parties, Halloween birthdays, or movie night snacks.
If your guests love decorating, send them home with their own mini versions of these Pumpkin S’mores Cookies to keep the spooky spirit going.
FAQs
What are Halloween dirt cups made of?
Halloween dirt cups are made with layers of chocolate pudding, crushed Oreo cookies, and topped with spooky treats like gummy worms, candy eyeballs, or tombstone cookies. Some variations include whipped topping, green-dyed pudding, or mini pumpkins for added flair.
Can I make Halloween dirt cups ahead of time?
Yes! You can prepare the pudding and crushed cookies a day in advance and store them separately in the fridge. Assemble the cups just before serving to keep the cookie “dirt” crunchy. Fully assembled cups stay fresh in the fridge for up to 2 days.
What toppings can I use for spooky dirt cups?
Popular toppings include gummy worms, candy bones, candy eyeballs, marshmallow ghosts, and Milano cookies decorated as tombstones. You can also use themed sprinkles or crushed Halloween candy to get creative.
Are Halloween dirt cups kid-friendly and safe for parties?
Absolutely! They’re easy to make, require no baking, and can be customized to be allergy-friendly. Use dairy-free pudding, gelatin-free gummies, and gluten-free cookies as needed. Plus, they’re perfect for school events, classroom parties, or build-your-own dessert stations.
Halloween Dirt Cups are the ultimate easy and quick recipe for spooky season. They’re fun to make, even more fun to eat, and endlessly customizable for parties of all sizes. Whether you’re hosting a classroom bash or looking for something festive to share with family, these no-bake treats deliver big flavor with minimal effort.
Want to try more Halloween magic? Explore recipes like Pumpkin Snickerdoodle Cookies or Pecan Chocolate Chips Cookies and keep the festive fun going.

